Wednesday, August 16, 2017

Running a SharePoint framework web part with elevated privileges – Focus on Azure Functions – Part 2

In the previous post we looked at the following steps:
  1. Create an Azure account
  2. Create an Azure Function App
  3. Create the Azure Function
  4. Configure the Azure Function
    1. Support continuous deployment
    2. Enable CORS

In this post, I will continue with steps "Configure access to SharePoint" and "Install NuGet packages" which belongs to Configure the Azure Function. Then, "Develop the code to read site collection administrators" and "Calling the Azure Function from your SPFx web part".

4.3. Configure access to SharePoint:


4.3.1 Register your function in SharePoint:


If you have developed provider-hosted SharePoint Add-ins in the past, you know this step since I will use the same approach in registering the Azure Function with the Azure Access Control Service (ACS) and the SharePoint App Management Service of the tenant. It allows the Azure Function to execute requests in SharePoint with the app-only context.

To register the Azure Function as an Add-in, navigate to "http://<your tenant>.sharepoint.com/_layouts/15/AppRegNew.aspx" and enter the required information. Generate a new client id and client secret. The Add-in title can be your function’s name. Use your function’s URL to configure App Domain and Redirect URI. Here my configuration:


After clicking Create, you will see this message "The app identifier has been successfully created.". Now copy the client id and client secret, since we will need these values later.

If you want to understand more about the registering process, check out this article.

4.3.2. Grant permissions for function:


Since we have finished the registration step, it is time to grant the function permissions to execute requests in SharePoint.

Navigate to "http://<your tenant>.sharepoint.com/_layouts/15/AppInv.aspx" and look up the Add-in you have just created using its client id. Then, enter the following code in the Permissions field to give the function full control of the site collection you are configuring it for.


As you're granting full control to an Add-in, the client secret is as important as the password for your SharePoint administration account!

Here my configuration:


After clicking Create, you will be requested to trust the Add-in. It is similar to installing an app on your cell phone!


4.3.3. Configure App Settings in the function:


Using the client id and client secret from the step above, it is possible to authenticate to SharePoint and run our code with elevated privilege. Therefore, we need to configure the function’s application settings to use these values in the function’s code.

First, open the Application settings:


Then, add the client id and the client secret of your newly registered Add-in to the App settings:


After clicking Save, you have the essential information to run the function with the app-only context which give us the RunWithElevatedPrivileges effect.

4.4. Install NuGet packages:


Instead of having to upload DLLs using FTP or KUDU to your function’s directory, the Azure Function offers support to NuGet packages, which makes our lives much easier. Once configured, the NuGet packages will automatically be downloaded and installed to the function’s directory. It happens the first time the code runs! To use the types defined in the NuGet packages, you just need to add using statements to your run.csx file.

To communicate with SharePoint, I used the PnP core components which are much more convenient than directly working with the managed CSOM for authentication etc. Therefore, I’ve described below how to configure the usage of NuGet packages in your function.

The project.json file is the location to manage the NuGet packages. Add this file to the function’s directory and add a reference to SharePointPnPCoreOnline version 2.16.1706.0 to it.

Here’s how it looks in Visual Studio Code after committing and pushing the changes. Since I configured continuous deployment, I always need to execute this step.


Alright, the preparation steps are finished, but there is still work to be done. It never ends! J It is finally time to develop the code to retrieve the site collection administrators.

5. Develop the code to read site collection administrators:


Let’s start developing the logic J The code below is very simple. The program requires a site collection URL to retrieve the administrators. Then, it fetches client id and client secret from the app settings and use it to authentication in SharePoint. Finally, it reads the site collection administrators using the GetAdministrators method, which is available through the PnP library. Then, it’ll return the site administrators’ display names. That’s it! I added a couple of comments to the code, so it is easier to understand.

For instance, if you change the app permission to read, you won’t get any site collection administrators. There is also no error indicating that you don’t have enough permissions.

Before using the function in the SPFx web part, I tried the function using the integrated test area in Azure. It’s only about entering a JSON object with the properties required by the function and running it.


6. Calling the Azure Function from your SPFx web part:


The SPFx web part is also very simple. It builds on top of the "hello world" sample from Microsoft, which is what you get after running the yeoman SharePoint generator. If you have never created a SPFx web part before and want to try it, I recommend you use the SPFx tutorial about building your first SharePoint client-side web part.

The first thing we need is the function’s URL. You will find it in the Azure Portal:


Please note that the function URL already contains the function key as a query string parameter (code). If it is not provided, you must pass it using a x-functions-key header when calling the Azure Function.

Now it is time to call the function from the web part. The private method _retrieveAdministrators contains the logic to communicate with the Azure function. Since I’m using the HttpClient object to call the Azure function, there are a few things to consider when executing POST calls. First, I configured the Headers object. Then I configured the IHttpClientOptions passing the Headers object and the body which contains the current site collection URL as a JSON object. This is the more relevant part of the code! I also handled possible errors using resp.ok for checking the function’s success (HTTP response status code 200). I shared the main part of the code through GitHub.


Finally, the web part is able to call the Azure function which returns the site collection administrators. Since I only granted the function access to a specific site collection, the function will return an error message when the web part is used in another site collection different from the one I configured. Here you can see the possible outputs:

Calling the function from the configured site collection:


Calling the function from any other site collection:


Summary:


After a few configurations, the Azure Function is ready to use and you can put your focus on more important things like the development of the code instead of programming a web service and hosting it somewhere. Since the focus of this post relies on the Azure Function, I spent less time on the development of the web part. But it is enough to understand the idea of elevating user’s privileges. Depending on the permissions you configure in your Add-in, you can have access to a site collection or even full control in the entire tenant. The combination of the app-only context and the Azure Function gives you sight beyond sight (enhanced vision) in SharePoint. In other words, with the correct configurations you can do whatever you want from your SPFx web part in SharePoint!

Links:

Tuesday, August 1, 2017

Running a SharePoint framework web part with elevated privileges – Focus on Azure Functions – Part 1

SharePoint Framework (SPFx) web parts are modern, fancy and only run in the context of the current user :) So far so good! But what if I want to do more? What if I want to elevate the user privileges like we have done in the past with SharePoint Add-ins, where we use the App-Only context or like the farm solutions, where we use the static method RunWithElevatedPrivileges. The answer for all these questions are web services.

I will introduce you to Azure Functions which when well configured gives you sight beyond sight (enhanced vision) in SharePoint. It's like the sword of Omens which increases the power of the Thundercats. There are also other options for web services like Azure App API, your own web service etc. You can also use Microsoft Graph which requires authentication using ADAL.js or use the GraphHttpClient which should not be used in a production environment, since it is still in a preview version (July 2017). Anyway, I will be showing you how to configure an Azure Function and how to use it in a SharePoint Framework web part. Since there are a lot of things to show, I’ve split the content of this article in two blog posts.

Everything starts with a learning project:

This learning project consists of calling an Azure Function from a SPFx web part, which will return all administrators of the current site collection. All site users must be able to see the correct content independent of their permission levels.

Software used:


Steps:

  1. Create an Azure account
  2. Create an Azure Function App
  3. Create the Azure Function
  4. Configure the Azure Function
    1. Support continuous deployment
    2. Enable CORS
    3. Configure access to SharePoint
    4. Install NuGet packages
  5. Develop the code to read site collection administrators
  6. Calling the Azure Function from your SPFx web part

1. Create an Azure account:


If your company doesn't have an Azure account yet, please go ahead and ask your boss if your company is driving the business in the right direction. THIS IS A JOKE, DON'T DO THAT ;) In my opinion, cloud plays a very important role in business today. Of course, you can use Amazon Web Service (AWS) or something similar to it, but as a SharePoint developer and since Windows 3.11 J (my first operating system) I’ve trusted Microsoft to be the right partner for my business.

If you already have an Azure account, skip this step. Otherwise, I’ll demonstrate how to create a Microsoft Azure trial account which gives you 200 dollars (170 euros) in credits to try any Azure service for a period of 30 days. You need to enter your credit card information but you will never be charged unless you choose to subscribe. The credit card information is for identity verification only.

To register to an Azure account, navigate to https://azure.microsoft.com/en-us/free/ and click on start free. After authentication with a valid Microsoft account, you will be redirected to the trial register form. Just follow the registration's steps which are very user friendly. This is what the register form looks like:


Now that you have registered, you have the power of Azure with you J Welcome to the world of endless possibilities!

2. Create an Azure Function App:


An Azure Function App is a serverless service where you don't need to worry about infrastructure. It is a container for Azure Functions and supports several programming languages like C#, JavaScript, PowerShell, Python, F# etc. You can also include DLLs (your own or others) and use this as part of your function. Depending on your needs, you can use different events to trigger your function like HTTP, Time (making it a webjob), Azure Blob, Azure Storage etc. This way you can easily create your own REST API without a lot of configuration. Check the function's overview and convince yourself!

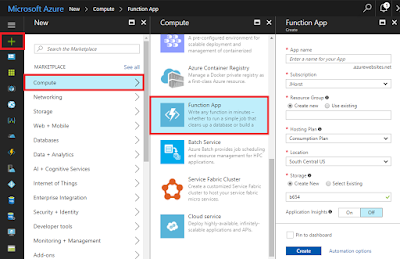
To create the Function App, navigate to the Azure Portal (https://portal.azure.com). After logging in, click new > Compute > Function App which opens the form to requests for a new function app.

Add function app

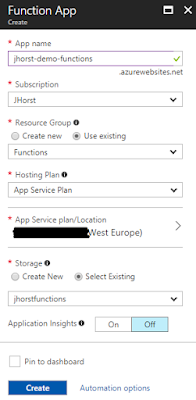
In the Function App form, specify the data required, but pay attention to the hosting plan, since it plays an important role in the way your function is going to perform.

Consumption plan: Is not bound to predefined computer resources (RAM, CPU etc.) It scales out automatically, even during periods of high load. You just pay for the execution time. So, if your function is not running, there are no costs! But be aware of the function timeout. Functions on Consumption Plan are limited to an execution time up to a maximum of 10 minutes.

Azure Service Plan: Is a dedicated virtual machine (VM) with predefined resources. The VM's cost is fixed. The more you pay the better resources you get! Consider using this plan to bypass the function timeout which occurs in the Consumption Plan. It is also a chance to reuse already existing VMs which are underutilized. Don't forget to activate the function Always On, since the VM goes idle after a few minutes of inactivity.

After filling in the required data, your form should look like this:


Since I already have an underutilized VM, I will reuse it to minimize my costs running my Azure Functions.

3. Create the Azure Function:


Once the function has finished creating, it is time to configure it. You can find your Azure Function, for instance, by navigating to All Resources and searching there for your function’s name. 

Once in the function, click the new function button:


Azure offers you premade functions, but I'd recommend you clicking Custom function. This way you can see all the possible triggers and languages supported.


Select Language > All and Scenario > All to see all the supported templates. Since the general availability in November 2016 the list of templates has considerably increased and there are always new templates coming in. The possibilities are tremendous with this Azure service!

For this learning project, choose HttpTrigger - C#. What does it mean? This function is triggered over http calls and the function's programming language is C#.

Depending on your needs, you can have different authorization levels:
  • Admin: Requires master key on calls.
  • Function: Requires function key on calls.
  • Anonymous: Requires no API key on calls. Anyone can call the function!

Here is how my settings look:


After creating your function, you will see the integrated editor which contains a sample code. You can try it by pressing Run over the editor. By default, the Azure Function contains two files:

run.csx: CSX means C# script file and was introduced with Roslyn. It contains a Run method which is similar to the main method in a console application. The focus relies here on writing a C# function.

function.json: This file contains function's bindings which are specified via the property's name. For instance, our income binding is httpTrigger and the name is req. In the function's signature you will find the parameter HttpRequestMessage req which refers to the entry in the function.json file.

4. Configure the Azure Function:


In this step, I will show you how to support continuous deployment, enable CORS, register your function in SharePoint and use NuGet packages in your function.

4.1. Support continuous deployment:


This step is optional! Actually, you could write the entire code in the integrated editor of your Azure function, but it is not what you will do when developing functions for productive scenarios. I also like the idea of having a code editor like Visual Studio Code which gives me support during the code’s development. Hence, I'll integrate continuous deployment from Visual Studio Team Services (VSTS). There are also other systems like GitHub, Bitbucket, OneDrive, Dropbox etc. 

4.1.1. Start creating a Visual Studio Team Services project:


4.1.2. Then clone it to your project's directory in your local machine:


4.1.3. Add the two Azure Function’s files to the project’s directory:


There are different ways to obtain the two Azure Function’s files "run.csx" and "function.json": 

  • Just copy the file’s content into new files in your project’s directory.
  • Use KUDU
  • Use FTP

Very important: The function’s files are hosted in the followed structure:

wwwroot
 | - host.json
 | - retrieveadmins
 | | - function.json
 | | - run.csx

If you don’t have the folder "retrieveadmins" in your project’s directory, the integration will not work since the files will directly be stored in the wwwroot directory. 

To check if the integration with VSTS is working well, open Visual Studio Code and change some content in the run method. I have just added another log entry log.Info(“The value passed id ” + name);. The changes made will not apply to your Azure Function until you’ve committed and pushed it. It also means that you need to commit and push every change before testing it J


4.1.4. Configure the continuous deployment in the Azure Function:


Open the Deployment Options to configure the continuous deployment:


Click Setup, then click Configure required settings:


Finally, choose VSTS to configure it:


Enter the required fields and click OK. Here my configurations: 


4.1.5. Check integration with VSTS:


In Visual Studio Code, you can now commit and push your changes:


After pushing the changes, navigate to the Azure Function and check the integrated editor to see the changes. It only takes a few seconds for the changes to apply.


With the steps above, we’ve laid the foundation for a professional development. We are no longer depending on the integrated editor and we can benefit from the advantages offered by VSTS.

4.2. Enable CORS


Since the SPFx web part will request the Azure Function from JavaScript in a different domain, it is important to enable Cross-Origin Resource Sharing (CORS). Otherwise, the Azure Function will block the cross-domain requests from our SPFx web part. This includes all kind of requests, also those made from the SharePoint workbench.

For instance, I need to allow the following origins (domains) to make cross-origin calls to my Azure Function:
  • https://localhost:4321
  • https://example.sharepoint.com

First, open CORS to configure it:


Then, specify the origins. You need to enter any domain which will call your function from a JavaScript code:


After clicking Save, the Azure Function allows calls from the SPFx web parts.


You'll find the steps below in the second part of this article:
  • Configure access to SharePoint
  • Install NuGet packages
  • Develop the code to read site collection administrators
  • Calling the Azure Function from your SPFx web part

To be continued...